by Priya Nakamura Updated Apr 23, 2026
WiFi dead zones are the silent killers of home connectivity — those frustrating spots where your signal drops to nothing just when you need it most. Whether it's the back bedroom, the basement, or the far corner of your living room, fixing WiFi dead zones in your home is entirely possible with the right approach and a little know-how.

In this guide, you'll learn exactly why dead zones form, how to diagnose them, and the most effective solutions — from repositioning your router to deploying mesh systems — so every corner of your home gets a reliable signal. If your overall speeds are suffering too, our guide on fixing slow WiFi pairs well with this one, and understanding how to change your WiFi channel can dramatically improve coverage once you've identified the problem areas.

WiFi signals are radio waves, and like all radio waves they weaken as they travel through space — a phenomenon called path loss. Every meter of air your signal must cross reduces its strength, but the real killers are physical obstructions. Walls, floors, and ceilings made of concrete, brick, or metal can cut your signal strength by 50% or more with every layer they absorb. A router sitting on one end of a two-story home simply may not have enough transmit power to push a usable signal through three concrete walls and a floor to reach the far bedroom.
Interference from neighboring networks and household electronics compounds the problem significantly. Microwave ovens, baby monitors, Bluetooth devices, and even neighboring routers all compete for the same 2.4 GHz or 5 GHz spectrum. When too many devices crowd a single channel, the noise floor rises and your effective range shrinks. Homes in dense apartment buildings can have dozens of overlapping networks, each stealing bandwidth and creating what feels like a dead zone even in relatively close proximity to the router.
Router placement is often the single biggest contributor to dead zones that most people overlook. Many households put their router wherever the ISP technician happened to install the coaxial or phone line outlet — often in a utility closet, near the front door, or in a corner of the house. This creates an asymmetric coverage pattern where half the home is bathed in strong signal while the other half is starved. A router broadcasting from one wall of a rectangular home has to push its signal twice as far to reach the opposite wall compared to a centrally placed device.
Building materials matter enormously, and older homes can be especially problematic. Plaster walls reinforced with metal mesh lath, common in pre-1950s construction, act almost like Faraday cages. Modern homes with radiant floor heating, foil-backed insulation, or metal stud framing create similar barriers. Even everyday items like fish tanks, large mirrors, and filing cabinets reflect and scatter WiFi signals in unpredictable ways, creating localized null zones that move and shift depending on where you stand.
Follow these steps in order — many dead zone problems can be solved for free before spending money on new hardware.
Choosing the right fix depends on your home's size, construction, and budget. Here's how the main solutions stack up.
| Solution | Approx. Cost | Coverage Added | Best For |
|---|---|---|---|
| Reposition Router | Free | Up to 30% improvement | Homes where router is in a corner or closet |
| WiFi Extender / Repeater | $20–$80 | 1–2 extra rooms | Small dead zones, renters who can't run cable |
| Powerline Adapter Kit | $40–$120 | Full wired speed to any room | Homes with consistent electrical wiring |
| MoCA Adapter (coax-based) | $80–$180 | Full wired speed via coax | Homes wired for cable TV throughout |
| Mesh WiFi System | $150–$400+ | Whole-home seamless coverage | Large homes, multi-story layouts, thick walls |
If you're buying a mesh system or new router to solve dead zones, opt for a tri-band model if your budget allows. Tri-band systems dedicate an entire 5 GHz radio as a backhaul channel between nodes — meaning the link between your mesh nodes never competes with your client devices for bandwidth. The result is significantly lower latency and higher throughput in rooms covered by satellite nodes, which is especially important if you're gaming, video conferencing, or streaming 4K content from a far-flung node.
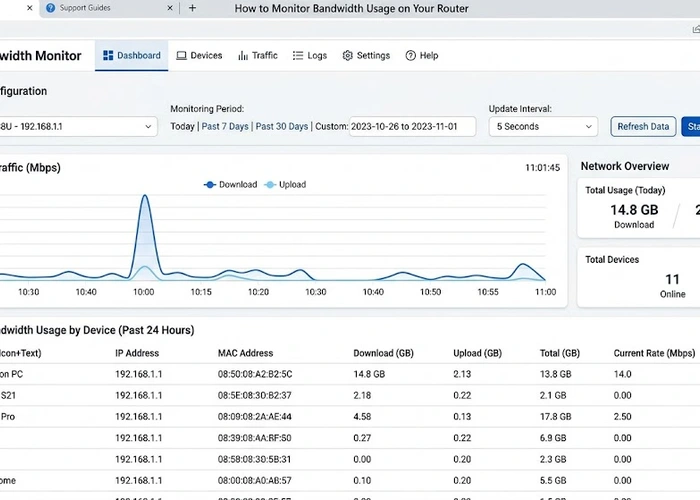
If you've tried repositioning and adding hardware but still have dead zones, it's time to dig deeper. Start by checking whether the problem is consistent or intermittent — intermittent dead zones are often caused by interference that comes and goes (a neighbor's microwave, a smart home device malfunctioning, or an automatic channel switch by your router). Consistent dead zones in specific locations point to a physical obstruction or a coverage gap that requires additional hardware placed closer to the problem area. Use a WiFi analyzer during different times of day to distinguish between the two.
Check whether your router is operating in mixed-mode compatibility. Many routers default to supporting 802.11b/g/n/ac simultaneously to accommodate older devices, but this forces the entire network to slow down when an old 802.11b device connects. If you have no legacy devices, switch to "N only" or "AC/AX only" mode in your router's wireless settings. This can meaningfully improve range and speed for all modern devices on the network. Our guide on WiFi security settings covers where to find these options in your admin panel.
Consider the height and orientation of your router's antennas. External antennas on a router broadcast perpendicular to their orientation — vertical antennas send signal horizontally across a floor, while antennas angled at 45 degrees push signal both horizontally and slightly up or down. For multi-story homes, angle one antenna horizontal and one at 45 degrees to improve vertical coverage between floors. If your router has internal antennas, there's nothing to adjust, but this is worth factoring in when choosing a replacement.
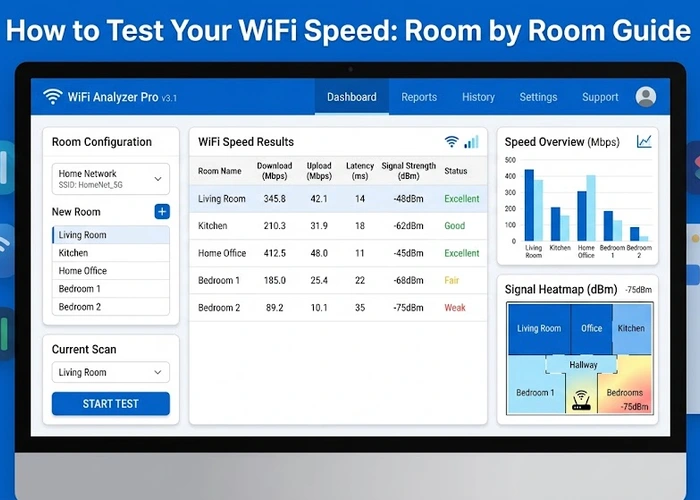
Pro Tip: Run a speed test in each room of your home and note the results. Then run another round of tests after making changes. Hard numbers take the guesswork out of diagnosing whether a repositioned router or new node actually improved things — perceived signal strength in your device's WiFi bar is notoriously unreliable and often doesn't reflect real-world throughput.
Dead zones are caused by a combination of distance, physical obstructions, and radio frequency interference. Thick walls made of concrete, brick, or metal-reinforced plaster absorb and reflect WiFi signals, while competing networks from neighbors raise the noise floor. Poor router placement — in a corner, closet, or near the floor — dramatically reduces how far a usable signal can reach.
A WiFi extender can improve coverage in a dead zone, but it comes with trade-offs: it creates a separate network SSID that requires manual switching, and it cuts available bandwidth roughly in half since it must receive and retransmit simultaneously on the same radio. For seamless whole-home coverage without the bandwidth penalty, a mesh WiFi system is a significantly better long-term solution.
A general rule of thumb is one mesh node per 1,500–2,000 square feet, but home layout and construction materials matter more than square footage alone. A compact two-story home with concrete floors may need three nodes where a sprawling single-story wood-frame home only needs two. Start with the base kit and add nodes only in areas where your WiFi analyzer still shows weak signal after initial placement.
Changing to a less congested channel won't extend your router's physical range, but it can dramatically improve performance in marginal areas that hover on the edge of usability. If a weak signal is being overwhelmed by interference on a crowded channel, switching to a clear channel can turn a barely-functional connection into a reliable one. Use our WiFi Channel Finder to identify the least-congested channel in your area before making changes.
Yes, significantly. The 2.4 GHz band travels farther and penetrates walls better than 5 GHz, making it the right choice for devices far from the router or separated by multiple walls. The 5 GHz band offers much higher speeds but its shorter wavelength means it loses strength more rapidly over distance and through obstructions. For dead zones caused by distance, connecting devices to 2.4 GHz often restores connectivity without any hardware changes.
WiFi 6 (802.11ax) improves efficiency in dense environments and can reduce congestion-related dead zones, but it doesn't fundamentally extend range beyond what WiFi 5 offered. WiFi 6E adds the 6 GHz band for blazing speeds at close range, but 6 GHz has even shorter range than 5 GHz and penetrates walls poorly. For dead zone elimination specifically, hardware placement and mesh topology matter far more than the WiFi generation you choose.
For authoritative networking standards and specifications, refer to the Internet Assigned Numbers Authority (IANA) or IETF RFC documents.
 |
 |
 |
 |

About Priya Nakamura
Priya Nakamura is a telecommunications engineer and networking educator with a Master degree in Computer Networks and a background in ISP infrastructure design and management. Her experience spans both the technical architecture of broadband networks and the practical challenges home users face when configuring routers, managing wireless coverage, and understanding connectivity standards. At RouterHax, she covers WiFi standards and protocols, networking concepts, IP addressing, and network configuration guides.
Promotion for FREE Gifts. Moreover, Free Items here. Disable Ad Blocker to get them all.
Once done, hit any button as below
|
|
|
|